

One of the main tools that helps programmers in software development is text editors. There are many editors today; each has its own advantages and disadvantages. Therefore, knowing them and their features is very important for programmers and makes their work easier. Meanwhile, The most famous and oldest Linux text editor is Vim Editor. In some cases, Vim is the only option for the developer. For example, when you want to do a specific configuration on a Linux server. What makes this editor special compared to other editors is its high customizability.
This article introduces and teaches Vim and reveals its various features. If you want to master working with this great editor, stay tuned to SOJECT until the end of the article.
What Is Vim?
Vim Editor is one of the most popular text editors that many programmers use. It stands for Vi Improved.
Vim software is a free and open-source text editor created by Bram Moolenaar. This editor was first released in 1991 for Unix versions. The primary purpose of building Vim was to upgrade the Vi editor, which was released in 1976. This text editor is actually a clone of the old Vi software. Like Vi, Vim is command-driven and terminal-based. One of the great features of Vim is that it is available in different types of operating systems, including various distributions of Linux, Windows and Mac.
Learn more: Code Editor Definition, Sublime Text Tutorial
Advantages of Vim Editor
- You can install this software on any operating system.
- You can use it in both terminal and graphic modes.
- It is small-sized and needs very little disk space to install
- The command line is axis-driven. So you can do complex tasks with just a few commands.
- It has high customization capability and uses a simple text file to save these settings.
- Many plugins are available for Vim to increase its capabilities.
- Vim is multi-window support. Using this feature, you can split the screen into several windows.
- It supports the multiple tabs feature and allows you to work in various files simultaneously.
- Vim commands are simple and easy to learn.
- It supports most programming languages.
Learn more:
How to Download and Install Vim on Windows
Vim has a low sized installation file, and You need no special prerequisites to use it on Windows. Installing Vim is as simple as installing any other software. Note that in Windows, you should use gVim, which is a graphical version of Vim. Follow the steps below to install this software:
1. Visit the vim.org website.
2- Click on the download option in the left panel.
3. Click on PC – MS-DOS and MS-Windows.
4. Click on gvim82.exe, then wait for the installation file to download.
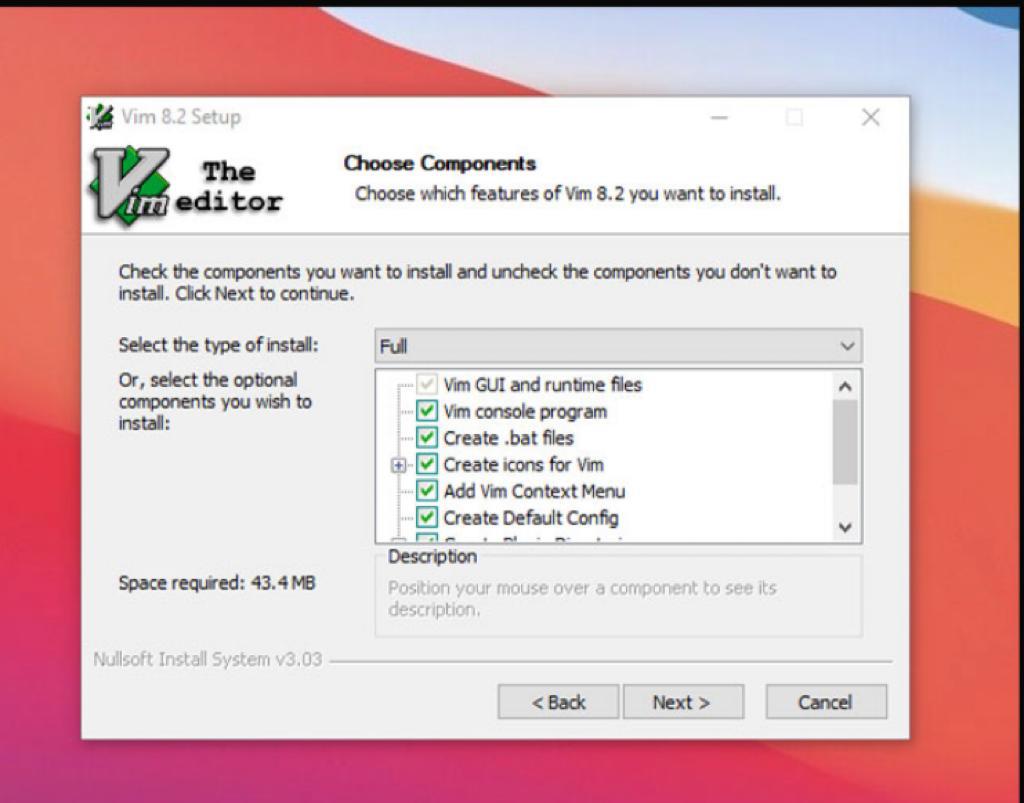
5- Finally, you can install the downloaded file on your system. Note that during installation, change the typical mode to full mode, as shown below.
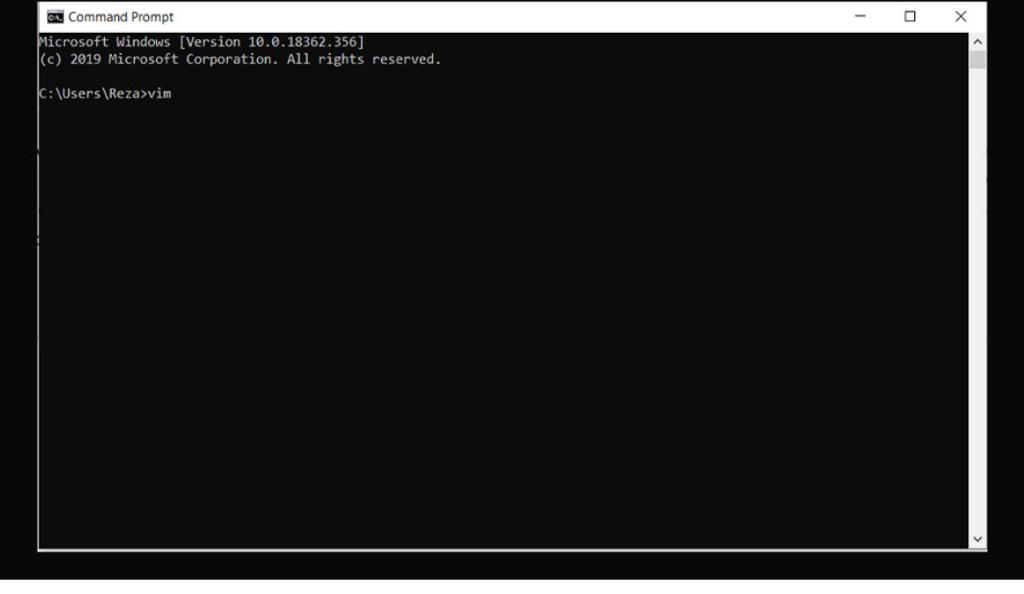
After the installation, you should run Vim on your Windows command line. To do this, first open the command prompt software in Windows, then type Vim according to the image.
After typing the word Vim and hitting the Enter key, Vim will open, and you will see a page like the one below.

Vim Editor Features and Settings
As mentioned in the previous section, you can use the Vim editor in both graphical and command line modes. Its graphic mode is displayed as follows and command-line mode is executed after typing the word Vim in the command line.

Different parts of Vim in Graphical Mode
As you can see in the image, there are several tabs at the top and the bottom of the code editing page.

The first tab is “file”, which you can use to open, create a new file, save, and so on.
Then there is the “edit” tab, which you can use to edit codes and make various settings on the editor.
The next icon is “tools” that provide various instruments such as error management, compiler setup, etc.
“syntax” is the next tab, which provides various tools for adjusting the syntax of a programming language, editing text colors, and more.
The “Buffers” tab helps you to edit a file without saving it. This tab offers various features to work on a file using RAM.
At the end there is a “window” and a “help” tab. The window tab is for creating, closing, and generally working with windows. “help” has a similar function as it has in other software and helps you become more familiar with the app.
There is also a tiny toolbar between the code editing page and tabs for quick access to common items.
Start Editing Your Code in Vim
As mentioned, the Vim editor has two modes of graphical and command line (which is the default mode.)
You can enter your code by pressing the “I” key, which stands for “Insert”. Furthermore, you can use the “Esc” key to change the editor mode to the command line.
To open a file in Vim, type the Vim filename in your system terminal. If available, the file will open. Otherwise, the software creates a new project which is named “Vim test.”
Commonly Used Commands in Vim
Note that to enter each command, use a colon (:) at the beginning.
Navigation Commands
You can use the following keys to move in command line mode:
H: To the left
J: Down
K: Upwards
L: To the right
Note that you can move in different directions using the arrows.
Some other movement-related commands include:
0 – Moving to the beginning of the line
^ – To the first non-blank line character
w – To the next word
W – Skip to next word (ignores punctuation such as semicolons, commas, etc.)
e – Move to the end of the word
E – To the end of the word (ignores bookmarks)
b – To the first word
B – To the first word (ignores punctuation)
ge – To the last character of the previous word
Editing Commands
d – Start the erase operation (actually performs the cut operation)
dd – clear line (cut line)
dw – Clear the word
d0 – Clear up the first line
dgg – Delete to the beginning of the file
dG – Delete to end of file
u – Undo the last action
Ctrl + r – Redo
r – Replace the current character with a new character
Search Commands
text / – To search you should replace the word you need to search with “text” in command.
n – Go to the next result
N – Go to the previous result
Copy and Paste Commands
yy – Copy the line
yw – Copy a word
yG – Copy to end of file
p – Paste after the marker
P – Paste before the marker
Save and Exit Commands
:w filename- To save the file for the first time. Note that you should write the name of the file instead of the filename.
:w – To save an existing file.
:q- To exit. However, if you have not saved the file, you will receive a notification.
:!q- To exit without applying the changes
A combination of the above two commands is widely used: qw: . This command lets you save the file and exit. You can also use ZZ as a replacement.
Working with Vim on Linux
Installing Vim on Linux is much easier than on Windows. This section describes how to install and configure Vim on Debian-based Linux. To install it, first enter the following commands in the terminal:

Run the following command to ensure Vim is installed correctly:

It should show the location of the vim binary, in this example:

Install Vim on RPM-Based Linux
To do this, first enter the following command in the terminal:

As in the previous example, enter the following command to ensure installation:

The rest of the commands and functions are similar to working with vim in Windows.
Vim Personalization
We can customize and modify Vim to suit our needs.
Change the font in Vim
To change the font in Wim, use the following command in command-line mode:

Color change in Vim
To change the color, run the following command:

Then you can choose one of the available colors to your liking.
Highlight text in Vim
To highlight characters after specific columns, do the following:


Explanation of the above command:
1- \%> After the column
2- 73 column count
3- V only work for authorized columns
4 -. \ + Contents with one or more characters
Add Line Numbers in Vim
To add line numbers, run the following command:

And to disable it use this command:

Check the Spelling in Vim
To enable word spell checking, use the following command:

To set the spelling language, use the following command:

For example, to set the German language:

Abbreviation:
Abbreviation can be used to create shortcuts for long strings. For example, the following command creates the abbreviation short.

If you type the word quick and then press the tab key, the string “the quick brown fox” is replaced.
Status Bar
The status bar is the line that appears at the bottom of the editor. The following command is used to activate it.

To deactivate the status bar, run the following command:

The Best Vim Plugins
We can extend Vim capabilities by using plugins. Vim supports many plugins, most of which are free. In this section, we will introduce a number of useful plugins.
1- DumpX plugin: Used to implement c ++ / c code.
2- Pathogen plugin: Used to manage Vim packages.
3- git-switcher.vim plugin: for saving and downloading Vim project files based on changes made in the git branch.
4- NERDTree plugin: It is a file manager that you can use to easily view different files and folders and open them easily.
5-NERD Commenter plugin: The importance of commenting in maintaining and beautifully coding is not hidden from anyone. This plugin helps you in the comments.
6-Vim-colors-solarized plugin: Vim has a number of themes by default. However, Solarized is one of the most popular themes for most programmers.
7- Syntastic Plugin: Syntax examines existing code and displays errors. It should be noted that Syntastic supports most programming languages.
Installing Plugins in VIM
In this section, we explain how to install the plugin in Vim. One way is to use a plugin manager. Vim software has different plugin managers. However, this tutorial doesn’t include managers. Instead, we use a more straightforward method.
To install the plugin,follow the following three steps:
1. Create a Vim/bundle folder. In the user’s home folder
2. Copy the plugin into this folder
3- Set runtime path in Vim
For example, to install the badwolf plugin, follow the steps below. It should be noted that this plugin is a Vim theme.
mkdir -p ~/.vim/bundle
cd ~/.vim/bundle/
git clone https://github.com/sjl/badwolf.git
echo “set runtimepath^ = ~/.vim/bundle/badwolf” > ~/.vimrc
Note: Insert a $ sign before each line
After these steps, the plugin is installed, and you can use the badwolf theme using the following command:

Updating Plugins in Vim
Plugins are a collection of files and folders in one main folder. To update plugins, it’s enough to update these folders.
Removing Plugins
Removing plugins in Vim is very simple. To do this, go through the following steps:
1- Delete the plugin folder in vim/bundle.
2. Change the runtime path accordingly.
Vim Tricks and Shortcuts
Vim software tricks and shortcuts help developers to code more conveniently. Here are three of these practical tricks.
Use jk instead of Esc
To exit the Insert mode, you should use the Esc key. However, this key is not closed to the rest of the buttons. So, instead of this key, you can type j and k in a row. Still, you should add the following code in the vimrc file.

Adding Date to Files
In many cases, you need to add the date to your file. This can be tedious and slow. By adding the following to vimrc you can add the date and time to your file by pressing the F3 key.
nmap <F3> i<C-R>=strftime(“%Y-%m-%d %a %I:%M %p”)<CR><Esc>
imap <F3> <C-R>=strftime(“%Y-%m-%d %a %I:%M %p”)<CR>
Copying to Vim
Vim uses a different method to copy text. Add the following code to the vimrc file, then you can replace the text copied from Vim by CTRL + V. Moreover, you can paste text from elsewhere with the p key.

Why Choose Vim Editor?
Vim Editor is a low-sized, high-performance, functional software that programmers can use to speed up their software development process. This software is especially effective when it is impossible to use the graphical environment to develop the software, and the programmer has to use the command-line environment.
You can use the openvim interactive site to learn Vim better.
If you use Vim, share your experience of this popular editor with other SOJECT users and us through the comments section. Also, if you know another trick or application plugin for this software, feel free to introduce it.
